Layouts
Layout is the base class for all views that provide positioning of child elements.
You can use the various layout containers to position elements. They evaluate the base properties of view such as width, height, minWidth and alignments, and expose additional properties for positioning child views (such as the four paddings). Depending on the way they arrange the children, there are five types of layouts - AbsoluteLayout, DockLayout, GridLayout, StackLayout and WrapLayout.
Absolute Layout
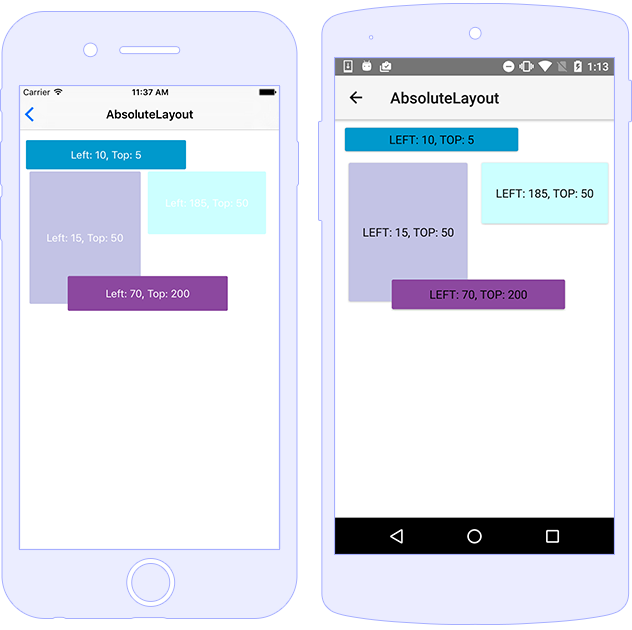
The AbsoluteLayout is the simplest layout in NativeScript. It uses absolute left-top (x/y) coordinates to position its children and the place of each of them depends on its Top, Left, Width and Height properties. The AbsoluteLayout will not enforce any layout constraints on its elements and will not resize them at runtime when its size changes.
API Reference for AbsoluteLayout Class
A basic usage and definition of AbsoluteLayout and its children in HTML.
<AbsoluteLayout>
    <Button text="Left: 10, Top: 5" left="10" top="5" height="42" width="230" backgroundColor="#0099CC"></Button>
    <Button text="Left: 15, Top: 50" left="15" top="50" height="190" width="160" backgroundColor="#C3C3E5"></Button>
    <Button text="Left: 185, Top: 50" left="185" top="50" height="90" width="170" backgroundColor="#CCFFFF"></Button>
    <Button text="Left: 70, Top: 200" left="70" top="200" height="50" width="230" backgroundColor="#8C489F"></Button>
</AbsoluteLayout>

Dock Layout
The DockLayout is a layout that arranges its children at its own outer edges (top, bottom, left and right or center). To define the docking side of a child element, use its dock property. To dock a child element to the center of the DockLayout, it must be the last child of the DockLayout and the stretchLastChild property of the DockLayout must be set to true.
API Reference for DockLayout Class
A basic usage and definition of DockLayout, its elements and setting its stretchLastChild property and in HTML.
<DockLayout stretchLastChild="true">
    <Button dock="left" text="left" style="background-color: #0099CC; margin: 5;"></Button>
    <Button dock="right" text="right" style="background-color: #8C489F; margin: 5;"></Button>
    <Button dock="bottom" text="bottom" style="background-color: #AA0078; margin: 5;"></Button>
    <Button dock="top" text="top" style="background-color: #B3B3D7; margin: 5;"></Button>
    <Button text="fill" style="background-color: #CCFFFF; margin: 5;"></Button>
</DockLayout>

Flexbox Layout One
Directions
This establishes the main-axis, thus defining the direction flex items are placed in the flex container. Flexbox is (aside from optional wrapping) a single-direction layout concept. Think of flex items as primarily laying out either in horizontal rows or vertical columns.
<!-- Reverse the natural flow of items -->
<FlexboxLayout flexDirection="row-reverse">
    <!-- Use even flexGrow to achieve uniform grid -->
    <Label flexGrow="1" class="p-15 text-center font-weight-bold" text="1" backgroundColor="#EEEEEE"></Label>
    <Label flexGrow="1" class="p-15 text-center font-weight-bold" text="2" backgroundColor="#DDDDDD"></Label>
    <Label flexGrow="1" class="p-15 text-center font-weight-bold" text="3" backgroundColor="#CCCCCC"></Label>
    <Label flexGrow="1" class="p-15 text-center font-weight-bold" text="4" backgroundColor="#BBBBBB"></Label>
    <Label flexGrow="1" class="p-15 text-center font-weight-bold" text="5" backgroundColor="#AAAAAA"></Label>
    <Label flexGrow="1" class="p-15 text-center font-weight-bold" text="6" backgroundColor="#999999"></Label>
</FlexboxLayout>
<FlexboxLayout flexDirection="column-reverse">
    <!-- Use even flexGrow to achieve uniform grid -->
    <Label flexGrow="1" class="p-15 text-center font-weight-bold" text="1" backgroundColor="#EEEEEE"></Label>
    <Label flexGrow="1" class="p-15 text-center font-weight-bold" text="2" backgroundColor="#DDDDDD"></Label>
    <Label flexGrow="1" class="p-15 text-center font-weight-bold" text="3" backgroundColor="#CCCCCC"></Label>
    <Label flexGrow="1" class="p-15 text-center font-weight-bold" text="4" backgroundColor="#BBBBBB"></Label>
    <Label flexGrow="1" class="p-15 text-center font-weight-bold" text="5" backgroundColor="#AAAAAA"></Label>
    <Label flexGrow="1" class="p-15 text-center font-weight-bold" text="6" backgroundColor="#999999"></Label>
</FlexboxLayout>
<FlexboxLayout flexDirection="row">
    <!-- Use even flexGrow to achieve uniform grid -->
    <Label flexGrow="1" class="p-15 text-center font-weight-bold" text="1" backgroundColor="#EEEEEE"></Label>
    <Label flexGrow="1" class="p-15 text-center font-weight-bold" text="2" backgroundColor="#DDDDDD"></Label>
    <Label flexGrow="1" class="p-15 text-center font-weight-bold" text="3" backgroundColor="#CCCCCC"></Label>
    <Label flexGrow="1" class="p-15 text-center font-weight-bold" text="4" backgroundColor="#BBBBBB"></Label>
    <Label flexGrow="1" class="p-15 text-center font-weight-bold" text="5" backgroundColor="#AAAAAA"></Label>
    <Label flexGrow="1" class="p-15 text-center font-weight-bold" text="6" backgroundColor="#999999"></Label>
</FlexboxLayout>
<FlexboxLayout flexDirection="column">
    <!-- Use even flexGrow to achieve uniform grid -->
    <Label flexGrow="1" class="p-15 text-center font-weight-bold" text="1" backgroundColor="#EEEEEE"></Label>
    <Label flexGrow="1" class="p-15 text-center font-weight-bold" text="2" backgroundColor="#DDDDDD"></Label>
    <Label flexGrow="1" class="p-15 text-center font-weight-bold" text="3" backgroundColor="#CCCCCC"></Label>
    <Label flexGrow="1" class="p-15 text-center font-weight-bold" text="4" backgroundColor="#BBBBBB"></Label>
    <Label flexGrow="1" class="p-15 text-center font-weight-bold" text="5" backgroundColor="#AAAAAA"></Label>
    <Label flexGrow="1" class="p-15 text-center font-weight-bold" text="6" backgroundColor="#999999"></Label>
</FlexboxLayout>
API Reference for FlexboxLayout Module API Reference for FlexboxLayout Class
Flexbox Layout Three
Wrap
By default, flex items will all try to fit onto one line. You can change that and allow the items to wrap as needed with this property. Direction also plays a role here, determining the direction new lines are stacked in.
Child related properties
- flex-wrap-before: Non-spec property controlling item wrapping, setting to true on flexbox child will force it to wrap on a new line
wrap
multi-line / left to right in ltr; right to left in rtl
<FlexboxLayout flexWrap="wrap" alignContent="flex-start" class="p-15" backgroundColor="lightgray">
    <Label class="h3 p-15" text="Gihub issue labels:"></Label>
    <!-- Use flexWrapBefore to control explicit line wrapping -->
    <Label flexWrapBefore="true" class="p-5 m-l-15 m-r-15 m-b-15 text-center" text="S: High" borderRadius="5" backgroundColor="#F93822"
        color="white"></Label>
    <Label class="p-5 m-l-15 m-r-15 m-b-15 text-center" text="T: Feature" borderRadius="5" backgroundColor="green" color="white"></Label>
    <Label class="p-5 m-l-15 m-r-15 m-b-15 text-center" text="3 - In Progress" borderRadius="5" backgroundColor="#A6BBC8"></Label>
    <Label class="p-5 m-l-15 m-r-15 m-b-15 text-center" text="S: Ullamcorper" borderRadius="5" backgroundColor="#F93822" color="white"></Label>
    <Label class="p-5 m-l-15 m-r-15 m-b-15 text-center" text="T: Vulputate" borderRadius="5" backgroundColor="green" color="white"></Label>
    <Label class="p-5 m-l-15 m-r-15 m-b-15 text-center" text="2 - Egestas magna" borderRadius="5" backgroundColor="#A6BBC8"></Label>
    <!-- Use flexWrapBefore to control explicit line wrapping -->
    <Label flexWrapBefore="true" class="p-5 m-l-15 m-r-15 m-b-15 text-center" text="S: High" borderRadius="5" backgroundColor="#F93822"
        color="white"></Label>
    <Label class="p-5 m-l-15 m-r-15 m-b-15 text-center" text="T: Phasellus" borderRadius="5" backgroundColor="green" color="white"></Label>
    <Label class="p-5 m-l-15 m-r-15 m-b-15 text-center" text="Nullam" borderRadius="5" backgroundColor="#A6BBC8"></Label>
    <Label class="p-5 m-l-15 m-r-15 m-b-15 text-center" text="T:Question" borderRadius="5" backgroundColor="#FFD900"></Label>
    <Label class="p-5 m-l-15 m-r-15 m-b-15 text-center" text="S:Medium" borderRadius="5" backgroundColor="#FFD900"></Label>
    <Label class="p-5 m-l-15 m-r-15 m-b-15 text-center" text="duplicate" borderRadius="5" backgroundColor="#A6BBC8"></Label>
</FlexboxLayout>
wrap-reverse
multi-line / right to left in ltr; left to right in rtl
<!-- flexWrap: wrap-reverse; alignContent: flex-start -->
<Label text="wrap-reverse" class="h4 p-t-15 p-l-15 p-r-15" textWrap="true"></Label>
<FlexboxLayout flexWrap="wrap-reverse" alignContent="flex-start" class="p-15" backgroundColor="lightgray">
    <Label class="h3 p-15" text="Gihub issue labels:"></Label>
    <Label flexWrapBefore="true" class="p-5 m-l-15 m-r-15 m-b-15 text-center" text="S: High" borderRadius="5" backgroundColor="#F93822"
        color="white"></Label>
    <Label class="p-5 m-l-15 m-r-15 m-b-15 text-center" text="T: Feature" borderRadius="5" backgroundColor="green" color="white"></Label>
    <Label class="p-5 m-l-15 m-r-15 m-b-15 text-center" text="3 - In Progress" borderRadius="5" backgroundColor="#A6BBC8"></Label>
    <Label class="p-5 m-l-15 m-r-15 m-b-15 text-center" text="S: Ullamcorper" borderRadius="5" backgroundColor="#F93822" color="white"></Label>
    <Label class="p-5 m-l-15 m-r-15 m-b-15 text-center" text="T: Vulputate" borderRadius="5" backgroundColor="green" color="white"></Label>
    <Label class="p-5 m-l-15 m-r-15 m-b-15 text-center" text="2 - Egestas magna" borderRadius="5" backgroundColor="#A6BBC8"></Label>
    <Label flexWrapBefore="true" class="p-5 m-l-15 m-r-15 m-b-15 text-center" text="S: High" borderRadius="5" backgroundColor="#F93822"
        color="white"></Label>
    <Label class="p-5 m-l-15 m-r-15 m-b-15 text-center" text="T: Phasellus" borderRadius="5" backgroundColor="green" color="white"></Label>
    <Label class="p-5 m-l-15 m-r-15 m-b-15 text-center" text="Nullam" borderRadius="5" backgroundColor="#A6BBC8"></Label>
    <Label class="p-5 m-l-15 m-r-15 m-b-15 text-center" text="T:Question" borderRadius="5" backgroundColor="#FFD900"></Label>
    <Label class="p-5 m-l-15 m-r-15 m-b-15 text-center" text="S:Medium" borderRadius="5" backgroundColor="#FFD900"></Label>
    <Label class="p-5 m-l-15 m-r-15 m-b-15 text-center" text="duplicate" borderRadius="5" backgroundColor="#A6BBC8"></Label>
</FlexboxLayout>
Justify Content
This defines the alignment along the main axis. It helps to distribute extra free space left over when either all the flex items on a line are inflexible, or are flexible but have reached their maximum size. It also exerts some control over the alignment of items when they overflow the line.
flex-end
Items are packed toward end line
<!-- justifyContent: flex-end; flexWrap: wrap  -->
<Label text="justifyContent: flex-end" class="h4 p-t-15 p-l-15 p-r-15" textWrap="true"></Label>
<FlexboxLayout flexWrap="wrap" justifyContent="flex-end" class="p-15" backgroundColor="lightgray">
    <Label class="h3 p-15" text="Gihub issue labels:"></Label>
    <Label flexWrapBefore="true" class="p-5 m-l-15 m-r-15 m-b-15 text-center" text="S: High" borderRadius="5" backgroundColor="#F93822"
        color="white"></Label>
    <Label class="p-5 m-l-15 m-r-15 m-b-15 text-center" text="T: Feature" borderRadius="5" backgroundColor="green" color="white"></Label>
    <Label class="p-5 m-l-15 m-r-15 m-b-15 text-center" text="3 - In Progress" borderRadius="5" backgroundColor="#A6BBC8"></Label>
    <Label class="p-5 m-l-15 m-r-15 m-b-15 text-center" text="S: Ullamcorper" borderRadius="5" backgroundColor="#F93822" color="white"></Label>
    <Label class="p-5 m-l-15 m-r-15 m-b-15 text-center" text="T: Vulputate" borderRadius="5" backgroundColor="green" color="white"></Label>
    <Label class="p-5 m-l-15 m-r-15 m-b-15 text-center" text="2 - Egestas magna" borderRadius="5" backgroundColor="#A6BBC8"></Label>
    <Label flexWrapBefore="true" class="p-5 m-l-15 m-r-15 m-b-15 text-center" text="S: High" borderRadius="5" backgroundColor="#F93822"
        color="white"></Label>
    <Label class="p-5 m-l-15 m-r-15 m-b-15 text-center" text="T: Phasellus" borderRadius="5" backgroundColor="green" color="white"></Label>
    <Label class="p-5 m-l-15 m-r-15 m-b-15 text-center" text="Nullam" borderRadius="5" backgroundColor="#A6BBC8"></Label>
    <Label class="p-5 m-l-15 m-r-15 m-b-15 text-center" text="T:Question" borderRadius="5" backgroundColor="#FFD900"></Label>
    <Label class="p-5 m-l-15 m-r-15 m-b-15 text-center" text="S:Medium" borderRadius="5" backgroundColor="#FFD900"></Label>
    <Label class="p-5 m-l-15 m-r-15 m-b-15 text-center" text="duplicate" borderRadius="5" backgroundColor="#A6BBC8"></Label>
</FlexboxLayout>
space-between
Items are evenly distributed in the line; first item is on the start line, last item on the end line
<!-- justifyContent: space-between; flexWrap: wrap  -->
<Label text="justifyContent: space-between" class="h4 p-t-15 p-l-15 p-r-15" textWrap="true"></Label>
<FlexboxLayout flexWrap="wrap" justifyContent="space-between" class="p-15" backgroundColor="lightgray">
    <Label class="h3 p-15" text="Gihub issue labels:"></Label>
    <Label flexWrapBefore="true" class="p-5 m-l-15 m-r-15 m-b-15 text-center" text="S: High" borderRadius="5" backgroundColor="#F93822"
        color="white"></Label>
    <Label class="p-5 m-l-15 m-r-15 m-b-15 text-center" text="T: Feature" borderRadius="5" backgroundColor="green" color="white"></Label>
    <Label class="p-5 m-l-15 m-r-15 m-b-15 text-center" text="3 - In Progress" borderRadius="5" backgroundColor="#A6BBC8"></Label>
    <Label class="p-5 m-l-15 m-r-15 m-b-15 text-center" text="S: Ullamcorper" borderRadius="5" backgroundColor="#F93822" color="white"></Label>
    <Label class="p-5 m-l-15 m-r-15 m-b-15 text-center" text="T: Vulputate" borderRadius="5" backgroundColor="green" color="white"></Label>
    <Label class="p-5 m-l-15 m-r-15 m-b-15 text-center" text="2 - Egestas magna" borderRadius="5" backgroundColor="#A6BBC8"></Label>
    <Label flexWrapBefore="true" class="p-5 m-l-15 m-r-15 m-b-15 text-center" text="S: High" borderRadius="5" backgroundColor="#F93822"
        color="white"></Label>
    <Label class="p-5 m-l-15 m-r-15 m-b-15 text-center" text="T: Phasellus" borderRadius="5" backgroundColor="green" color="white"></Label>
    <Label class="p-5 m-l-15 m-r-15 m-b-15 text-center" text="Nullam" borderRadius="5" backgroundColor="#A6BBC8"></Label>
    <Label class="p-5 m-l-15 m-r-15 m-b-15 text-center" text="T:Question" borderRadius="5" backgroundColor="#FFD900"></Label>
    <Label class="p-5 m-l-15 m-r-15 m-b-15 text-center" text="S:Medium" borderRadius="5" backgroundColor="#FFD900"></Label>
    <Label class="p-5 m-l-15 m-r-15 m-b-15 text-center" text="duplicate" borderRadius="5" backgroundColor="#A6BBC8"></Label>
</FlexboxLayout>
space-around
Items are evenly distributed in the line with equal space around them. Note that visually the spaces aren't equal, since all the items have equal space on both sides. The first item will have one unit of space against the container edge, but two units of space between the next item because that next item has its own spacing that applies.
<!-- justifyContent: space-around; flexWrap: wrap -->
<Label text="justifyContent: space-around" class="h4 p-t-15 p-l-15 p-r-15" textWrap="true"></Label>
<FlexboxLayout flexWrap="wrap" justifyContent="space-around" class="p-15" backgroundColor="lightgray">
    <Label class="h3 p-15" text="Gihub issue labels:"></Label>
    <Label flexWrapBefore="true" class="p-5 m-l-15 m-r-15 m-b-15 text-center" text="S: High" borderRadius="5" backgroundColor="#F93822"
        color="white"></Label>
    <Label class="p-5 m-l-15 m-r-15 m-b-15 text-center" text="T: Feature" borderRadius="5" backgroundColor="green" color="white"></Label>
    <Label class="p-5 m-l-15 m-r-15 m-b-15 text-center" text="3 - In Progress" borderRadius="5" backgroundColor="#A6BBC8"></Label>
    <Label class="p-5 m-l-15 m-r-15 m-b-15 text-center" text="S: Ullamcorper" borderRadius="5" backgroundColor="#F93822" color="white"></Label>
    <Label class="p-5 m-l-15 m-r-15 m-b-15 text-center" text="T: Vulputate" borderRadius="5" backgroundColor="green" color="white"></Label>
    <Label class="p-5 m-l-15 m-r-15 m-b-15 text-center" text="2 - Egestas magna" borderRadius="5" backgroundColor="#A6BBC8"></Label>
    <Label flexWrapBefore="true" class="p-5 m-l-15 m-r-15 m-b-15 text-center" text="S: High" borderRadius="5" backgroundColor="#F93822"
        color="white"></Label>
    <Label class="p-5 m-l-15 m-r-15 m-b-15 text-center" text="T: Phasellus" borderRadius="5" backgroundColor="green" color="white"></Label>
    <Label class="p-5 m-l-15 m-r-15 m-b-15 text-center" text="Nullam" borderRadius="5" backgroundColor="#A6BBC8"></Label>
    <Label class="p-5 m-l-15 m-r-15 m-b-15 text-center" text="T:Question" borderRadius="5" backgroundColor="#FFD900"></Label>
    <Label class="p-5 m-l-15 m-r-15 m-b-15 text-center" text="S:Medium" borderRadius="5" backgroundColor="#FFD900"></Label>
    <Label class="p-5 m-l-15 m-r-15 m-b-15 text-center" text="duplicate" borderRadius="5" backgroundColor="#A6BBC8"></Label>
</FlexboxLayout>
Multiple settings example
<!-- flexDirection; column; flexWrap: wrap-reverse; alignContent: flex-start + items w/ alignSelf options -->
<Label text="flexDirection; column; flexWrap: wrap-reverse; alignContent: flex-start + items w/ alignSelf options" class="h4 p-t-15 p-l-15 p-r-15"
    textWrap="true"></Label>
<FlexboxLayout flexDirection="column" flexWrap="nowrap" alignContent="flex-start" class="p-15" backgroundColor="lightgray">
    <Label class="h3 p-15" text="Gihub issue labels:"></Label>
    <Label class="p-5 m-l-15 m-r-15 m-b-15 text-center" text="S: High" borderRadius="5" backgroundColor="#F93822" color="white"></Label>
    <Label alignSelf="auto" class="p-5 m-l-15 m-r-15 m-b-15 text-center" text="T: Feature" borderRadius="5" backgroundColor="green"
        color="white"></Label>
    <Label alignSelf="center" class="p-5 m-l-15 m-r-15 m-b-15 text-center" text="3 - In Progress" borderRadius="5" backgroundColor="#A6BBC8"></Label>
    <Label alignSelf="stretch" class="p-5 m-l-15 m-r-15 m-b-15 text-center" text="S: Ullamcorper" borderRadius="5" backgroundColor="#F93822"
        color="white"></Label>
    <Label alignSelf="flex-end" class="p-5 m-l-15 m-r-15 m-b-15 text-center" text="T: Vulputate" borderRadius="5" backgroundColor="green"
        color="white"></Label>
    <Label alignSelf="flex-start" class="p-5 m-l-15 m-r-15 m-b-15 text-center" text="2 - Egestas magna" borderRadius="5" backgroundColor="#A6BBC8"></Label>
    <Label alignSelf="baseline" class="p-5 m-l-15 m-r-15 m-b-15 text-center" text="S: High" borderRadius="5" backgroundColor="#F93822"
        color="white"></Label>
    <Label class="p-5 m-l-15 m-r-15 m-b-15 text-center" text="T: Phasellus" borderRadius="5" backgroundColor="green" color="white"></Label>
</FlexboxLayout>
API Reference for FlexboxLayout Module API Reference for FlexboxLayout Class
Flexbox Layout Two
Flexbox (order and shrink)
This defines the ability for a flex item to grow if necessary. It accepts a unitless value that serves as a proportion. It dictates what amount of the available space inside the flex container the item should take up.
If all items have flex-grow set to 1, the remaining space in the container will be distributed equally to all children. If one of the children has a value of 2, the remaining space would take up twice as much space as the others (or it will try to, at least).
<FlexboxLayout flexDirection="row" class="p-15" color="white">
    <Label class="p-15 text-center font-weight-bold" backgroundColor="#965251" text="Item"></Label>
    <!-- Set flexGrow to 1 accomodate into any extra space -->
    <Label flexGrow="1" class="p-15 text-center font-weight-bold" backgroundColor="#d2b29b" text="Flex-Grow 1"></Label>
    <Label class="p-15 text-center font-weight-bold" backgroundColor="#F69256" text="Item"></Label>
</FlexboxLayout>
Flex order
By default, flex items are laid out in the source order. However, the order property controls the order in which they appear in the flex container.
<FlexboxLayout flexDirection="row" class="p-15" color="white">
    <!-- Control the order in which elements appear in the flex container -->
    <Label order="3" class="p-15 text-center font-weight-bold" backgroundColor="#965251" text="First"></Label>
    <Label order="2" class="p-15 text-center font-weight-bold" backgroundColor="#d2b29b" text="Second"></Label>
    <Label order="1" class="p-15 text-center font-weight-bold" backgroundColor="#F69256" text="Third"></Label>
</FlexboxLayout>
Flex shrink
This defines the ability for a flex item to shrink if necessary
<FlexboxLayout flexDirection="row" class="p-15" color="white" width="300">
    <!-- flexShrink this defines the ability for a flex item to shrink if necessary. Default shrink = 1 -->
    <Label class="p-15 text-center font-weight-bold" backgroundColor="#d2b29b" text="Shrink 1"></Label>
    <Label flexShrink="0" class="p-15 text-center font-weight-bold" backgroundColor="#F69256" text="Shrink 0"></Label>
    <Label class="p-15 text-center font-weight-bold" backgroundColor="#d2b29b" text="Shrink 1"></Label>
    <Label class="p-15 text-center font-weight-bold" backgroundColor="#d2b29b" text="Shrink 1"></Label>
    <Label class="p-15 text-center font-weight-bold" backgroundColor="#d2b29b" text="Shrink 1"></Label>
</FlexboxLayout>
API Reference for FlexboxLayout Module API Reference for FlexboxLayout Class
Grid Layout
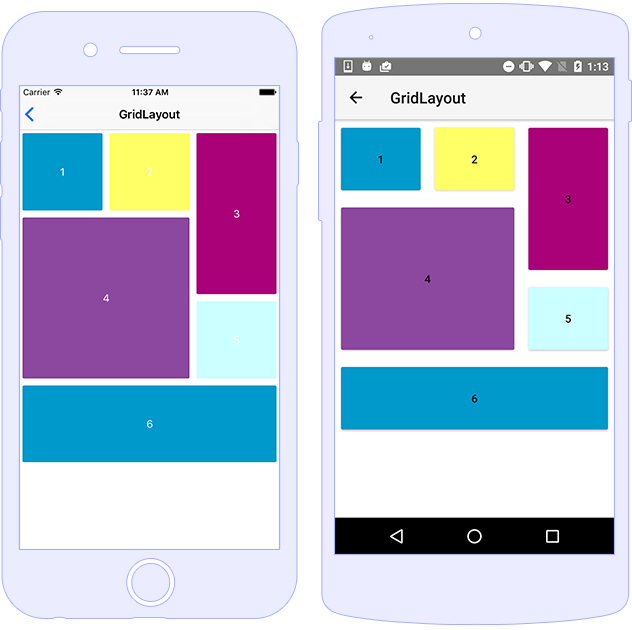
The GridLayout is a layout that arranges its child elements in a table structure of rows and columns. A cell can contain multiple child elements. Each one can span over multiple rows and columns, and even overlap the others. The GridLayout has one column and one row by default. To add additional columns and rows, you have to specify column definition items (separated by commas) to the columns property and row definition items (separated by commas) to the rows property of the GridLayout. The width of a column and the height of a row can be specified as an absolute amount of pixels, or automatically and by using the start sign (*) for relative percentages.
Note: While percentage values are not supported for creating rows and columns, you can use the start sign (
*) to take space based on relative percentage. For example, let's assume that we have the following setuprows="*, 2*, 2*". The GridLayout will take all the available space (meaning the space given by its parent or the space set via theheightproperty), will create three rows and will divide the space to 5 equal parts (as we have a total of5*). The first row will take one part (*), while the second and the third rows will take two parts (2*) meaning they will be twice as big compared to the first row. The setup would be equal to setting20%, 40%, 40%.
API Reference for GridLayout Class
A basic usage and definition of GridLayout,its rows and columns and its children in HTML.
<GridLayout columns="*,*,*" rows="*,*,*,*,*" sdkExampleTitle sdkToggleNavButton>
    <Button text="1" style="background-color: #0099CC; margin: 5;"></Button>
    <Button text="2" col="1" style="background-color: #FFFF66; margin: 5;"></Button>
    <Button text="3" col="2" rowSpan="2" style="background-color: #AA0078; margin: 5;"></Button>
    <Button text="4" row="1" rowSpan="2" colSpan="2" style="background-color: #8C489F; margin: 5;"></Button>
    <Button text="5" row="2" col="2" style="background-color: #CCFFFF; margin: 5;"></Button>
    <Button text="6" row="3" colSpan="3" style="background-color: #0099CC; margin: 5;"></Button>
</GridLayout>

Stack Layout
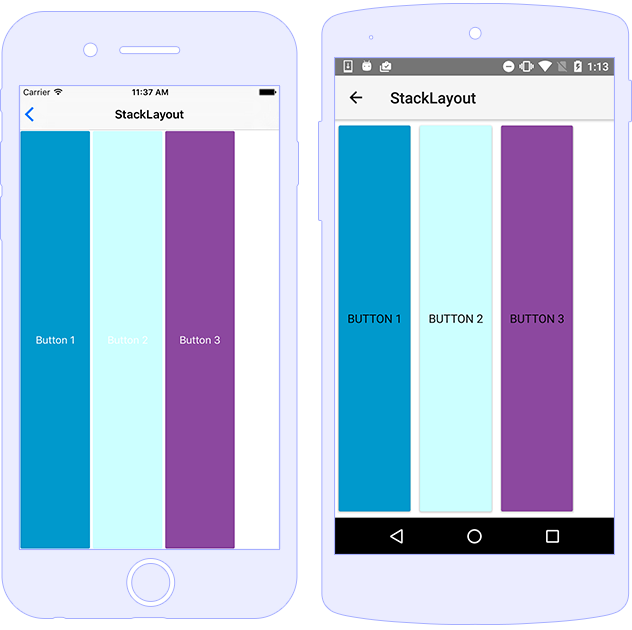
It arranges the elements one next to the other either vertically (from top to bottom) or horizontally (from left to right). The direction depends on the value of the orientation property (horizontal or vertical).
API Reference for StackLayout Class
A basic usage and definition of StackLayout, its orientation and elements in HTML.
<StackLayout orientation="horizontal">
    <Button text="Button 1" backgroundColor="#0099CC" width="100" margin="2"></Button>
    <Button text="Button 2" backgroundColor="#CCFFFF" width="100" margin="2"></Button>
    <Button text="Button 3" backgroundColor="#8C489F" width="100" margin="2"></Button>
</StackLayout>

Wrap Layout
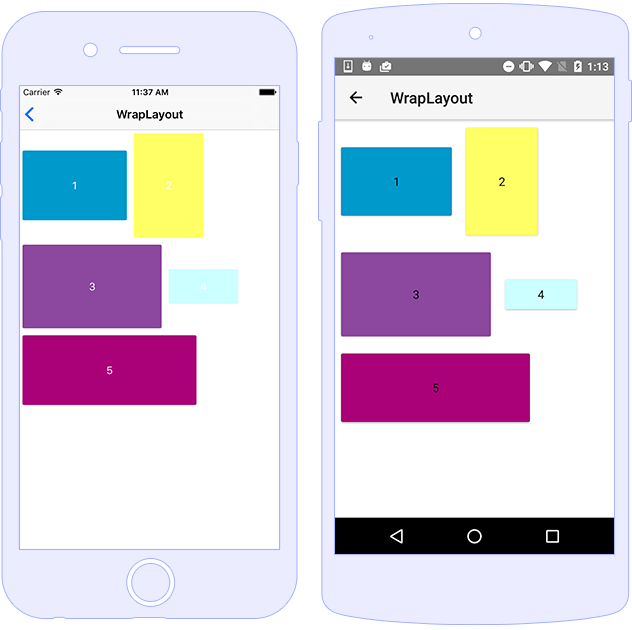
The WrapLayout is similar to the StackLayout, but it does not just stack all child elements to one column/row, it wraps them to new columns/rows if no space is left. The WrapLayout is often used with items of the same size, but this is not a requirement.
API Reference for WrapLayout Class
A basic usage and definition of WrapLayout, its orientation and elements in HTML
<WrapLayout>
    <Button text="1" width="150" height="100" style="background-color: #0099CC; margin: 5;"></Button>
    <Button text="2" width="100" height="150" style="background-color: #FFFF66; margin: 5;"></Button>
    <Button text="3" width="200" height="120" style="background-color: #8C489F; margin: 5;"></Button>
    <Button text="4" width="100" height="50" style="background-color: #CCFFFF; margin: 5;"></Button>
    <Button text="5" width="250" height="100" style="background-color: #AA0078; margin: 5;"></Button>
</WrapLayout>
