Using Webpack to Bundle Your Code
JavaScript code and general asset bundling have been a member of the web developer toolbox for a long time. Tools like Webpack have been providing support for an enjoyable development experience that lets you assemble client-side code from various module sources and formats and then package it together. Most importantly, they allow for page load time optimizations that reduce or parallelize the number of requests a browser makes to the server.
Why bundle scripts in a mobile app though? Aren't all files stored on the local device, so requesting them should be faster than an HTTP request? Yes, that is the case, but bundling still has an essential place in mobile app optimizations:
- Fewer filesystem operations on app startup since all code is loaded from a single bundle file. Mobile file storage is not known for being very performant.
- Smaller code size. Bundlers traverse the module import graph and do not bundle unused modules. Not using that obscure feature in module X? Don't make your users pay for it then.
- Tree-shaking. With the advent of ECMAScript 2015 modules, we have new tools that allow stripping unused parts of big modules and further reduce our application size.
With NativeScript 6 and above, Webpack is the primary developer workflow and can't be disabled.
Introducing Webpack
Webpack works by traversing your source tree starting from some "entry" modules and navigating through module imports. This makes it possible to collect just modules that are used in your program. Webpack is very extensible - you can customize every step of the bundling process and add support for all sorts of asset generation and manipulation procedures.
Installation and Configuration
With NativeScript 6 and above, the framework is automatically
adding nativescript-dev-webpack (as a
devDependency) and creating a default
webpack.config.js configuration file. The Webpack
application bundling and developer workflow are enabled by
default, and no further setup steps are required.
Note: For projects created with an older version of NativeScript (version 5.x.x and prior), you can run the
tns migratecommand to add the Webpack dependencies and configuration files. Detailed instructions for installing, configuring and using Webpack with NativeScript CLI 5.x and below can be found here
How nativescript-dev-webpack Works
Installing the plugin adds a webpack.config.js file
which contains sensible defaults, but it is designed to be as
readable and easy to modify as possible.
Note: In case you need to update your project dependencies or regenerate the configuration file, you can do that by running the
update-ns-webpackscript that comes with the plugin:
$ ./node_modules/.bin/update-ns-webpack --configs --deps
The --configs flag will update the
webpack.config.js and the
--deps flag will update the related Webpack
dependencies.
Usage
NativeScript CLI commands
- Run with Webpack and HMR
The Webpack bundling and Hot Module Replacement are enabled by
default. That means that the known CLI commands like
run and build won't need any
additional flags.
tns run
or
tns build
Both commands will execute your project with Webpack and HMR enabled.
Note: If you need to disable the HMR experience, you can achieve that by adding the
--no-hmrflag. With NativeScript 6.0.0 and above, Webpack is the primary developer workflow and can't be disabled.
- Pass Environment Variables
You can also provide environmental variables to the Webpack build:
$ tns build android --env.development --env.property=value
They can be accessed through the env object in the
Webpack configuration:
// webpack.config.js
module.exports = env => {
    console.dir(env); // { development: true, property: 'value' }
}
Publishing Application
Create a bundled version of the application for Android in release with the known release command - no additional flags are needed:
$ tns build android --release --keyStorePath ~/path/to/keystore --keyStorePassword your-pass --keyStoreAlias your-alias --keyStoreAliasPassword your-alias-pass
Once this is finished, proceed with uploading the output .apk
file in the
You can build a bundled version of the application for iOS in release with this script:
$ tns build ios --release --forDevice --teamId TEAM_ID
Note that if --teamId flag is emitted, the
NativeScript CLI will prompt for team ID during the build
process.
Once the release build is ready, you have two options:
-
Open
<project/platforms/ios/<project>.xcodeproj>(or<project/platforms/ios/<project>.xcworkspace>if present) in Xcode to configure project signing and upload the archive to App Store. This is the recommended option. -
Specify your development team in
<project>/app/App_Resources/iOS/build.xcconfigfrom the command line and execute
$ tns publish ios --ipa ipa-file-path-here
More options for publishing an iOS application can be found in the "Publishing for iOS article" article.
If there are multiple mobile provisioning profiles for the selected development team available on the machine, it is not guaranteed that Xcode will choose the desired one and publishing using the command line will be successful. Therefore, in such cases, we recommend manually configuring and uploading the project from Xcode.
Optimizations
Uglify.js
The Webpack configuration includes the
uglifyjs-webpack-plugin. The plugin performs code minification and improves the size
of the bundle. It is disabled by default because it slows down
the building process. You can enable it by providing the
--env.uglify flag:
$ tns build android|ios --env.uglify
Angular and Ahead-of-Time Compilation
The NativeScript Angular projects have the
@ngtools/webpack
plugin added by the
nativescript-dev-webpack plugin. The
@ngtools/webpack plugin performs Ahead-of-Time
compilation and code splitting for lazily loaded modules. If
your application is Ahead-of-Time compiled, you don't need the
Angular compiler included in your app bundle which results in
smaller application size and improved startup time.
To build with Ahead-of-Time compilation provide the
--env.aot flag:
$ tns build android|ios --env.aot
V8 Heap Snapshot
The Webpack configuration also includes the
NativeScriptSnapshotPlugin. The plugin loads a single Webpack bundle in an empty V8
context, a.k.a. snapshotted context, and after its execution
captures a snapshot of the produced V8 heap and saves it in a
.blob file. The .blob file is included
in the .apk bundle and is loaded by the Android
Runtime on app initialization. This prevents the need for
loading, parsing, and executing the script on app startup, which
can drastically decrease the starting time.
You can use the snapshot plugin only for
release builds. You need to provide the
--env.snapshot flag along with the other release
arguments:
$ tns build android --env.snapshot --release --keyStorePath ~/path/to/keystore --keyStorePassword your-pass --keyStoreAlias your-alias --keyStoreAliasPassword your-alias-pass
Known limitations:
-
No iOS support. Heap snapshot is a V8 feature which is the
engine used in the Android Runtime. Providing
--env.snapshotflag on the iOS bundling commands will not affect.
V8 Heap Snapshot per architecture
The Android app size can be reduced by splitting the app per
device architecture. However, the blob files
generated by the --env.snapshot are just assets
which cannot be split.
In order to get a maximum app size reduction, you can pass an
additional --env.compileSnapshot flag which
compiles the static assets produced by
--env.snapshot into .so files allowing
the native build to split them per architecture. The snapshot
compilation requires the Android NDK to be installed on your
system. It is strongly recommended that the same version of the
NDK is used to produce the snapshot file as the one used to
compile the {N} runtime itself. The current NDK version used in
the runtime can be found in
its settings.json file.
NOTE: Read more about reducing the Android app size in the Android App Bundle article
NativeScriptSnapshotPlugin configuration
The NativeScriptSnapshotPlugin by default comes
with the following configuration:
if (snapshot) {
    config.plugins.push(new nsWebpack.NativeScriptSnapshotPlugin({
        chunk: "vendor",
        requireModules: [
            "tns-core-modules/bundle-entry-points",
        ],
        projectRoot,
        webpackConfig: config,
        snapshotInDocker,
        skipSnapshotTools,
        useLibs
    }));
}
-
chunk- the name of the chunk to be snapshotted. -
requireModules- modules in the snapshotted chunk that should be executed at build time. You shouldn't add modules that access directly native Android APIs here since they are available only at runtime. projectRoot- path to the app root folder.-
webpackConfig- Webpack configurations object. The snapshot generation modifies the Webpack config object to ensure that the specified bundle will be snapshotted successfully.
Other options
-
targetArchs- Since the serialization format of the V8 heap is architecture-specific, we need a different blob file for each V8 library target architecture. The Android Runtime library contains 4 architecture slices -ia32(x86),ia64(x86_64),arm(armeabi-v7a) andarm64(arm64-v8a).
Snapshot compilation options:
-
useLibs- the option is configurable through--env.compileSnapshotand compiles the static assets produced by--env.snapshotinto.sofiles allowing the native build to split them per architecture. This will reduce the app size when using the--aaboption. -
androidNdkPath- Path to a local installation of Android NDK. If not set, the plugin is looking for it in ANDROID_NDK_HOME, the global PATH or downloaded from Android Studio.
Note: The snapshot compilation is the recommended way of reducing the app size along with the Android App bundle.
Advanced debugging - checking if the snapshot is enabled
If you want to toggle whether specific logic is executed only in
the snapshotted context you can use the
global.__snapshot flag. Its value is
true only if the current execution happens in the
snapshotted context. Once the app is deployed on the device, the
value of the flag is changed to false. There is
also global.__snapshotEnabled flag. Its only
difference compared to global.__snapshot is that
its value is true in both snapshotted and runtime
contexts, given that snapshot generation is enabled.
function logMessage(message) {
    if (global.__snapshotEnabled) {
        if (!global.__snapshot) {
            console.log("The current execution is happening in runtime context when we have all {N} APIs available, including console.log(), so this line of code won't fail.");
        }
        console.log("This will fail if logMessage is called in snapshotted context because console.log() is not available there.");
    }
}
Custom Application and Activity
NativeScript provides a way to create custom
android.app.Application and
android.app.Activity implementations. Please, refer
to
this
documentation article for a detail description of how to achieve
these as well as how to configure and bundle such a project.
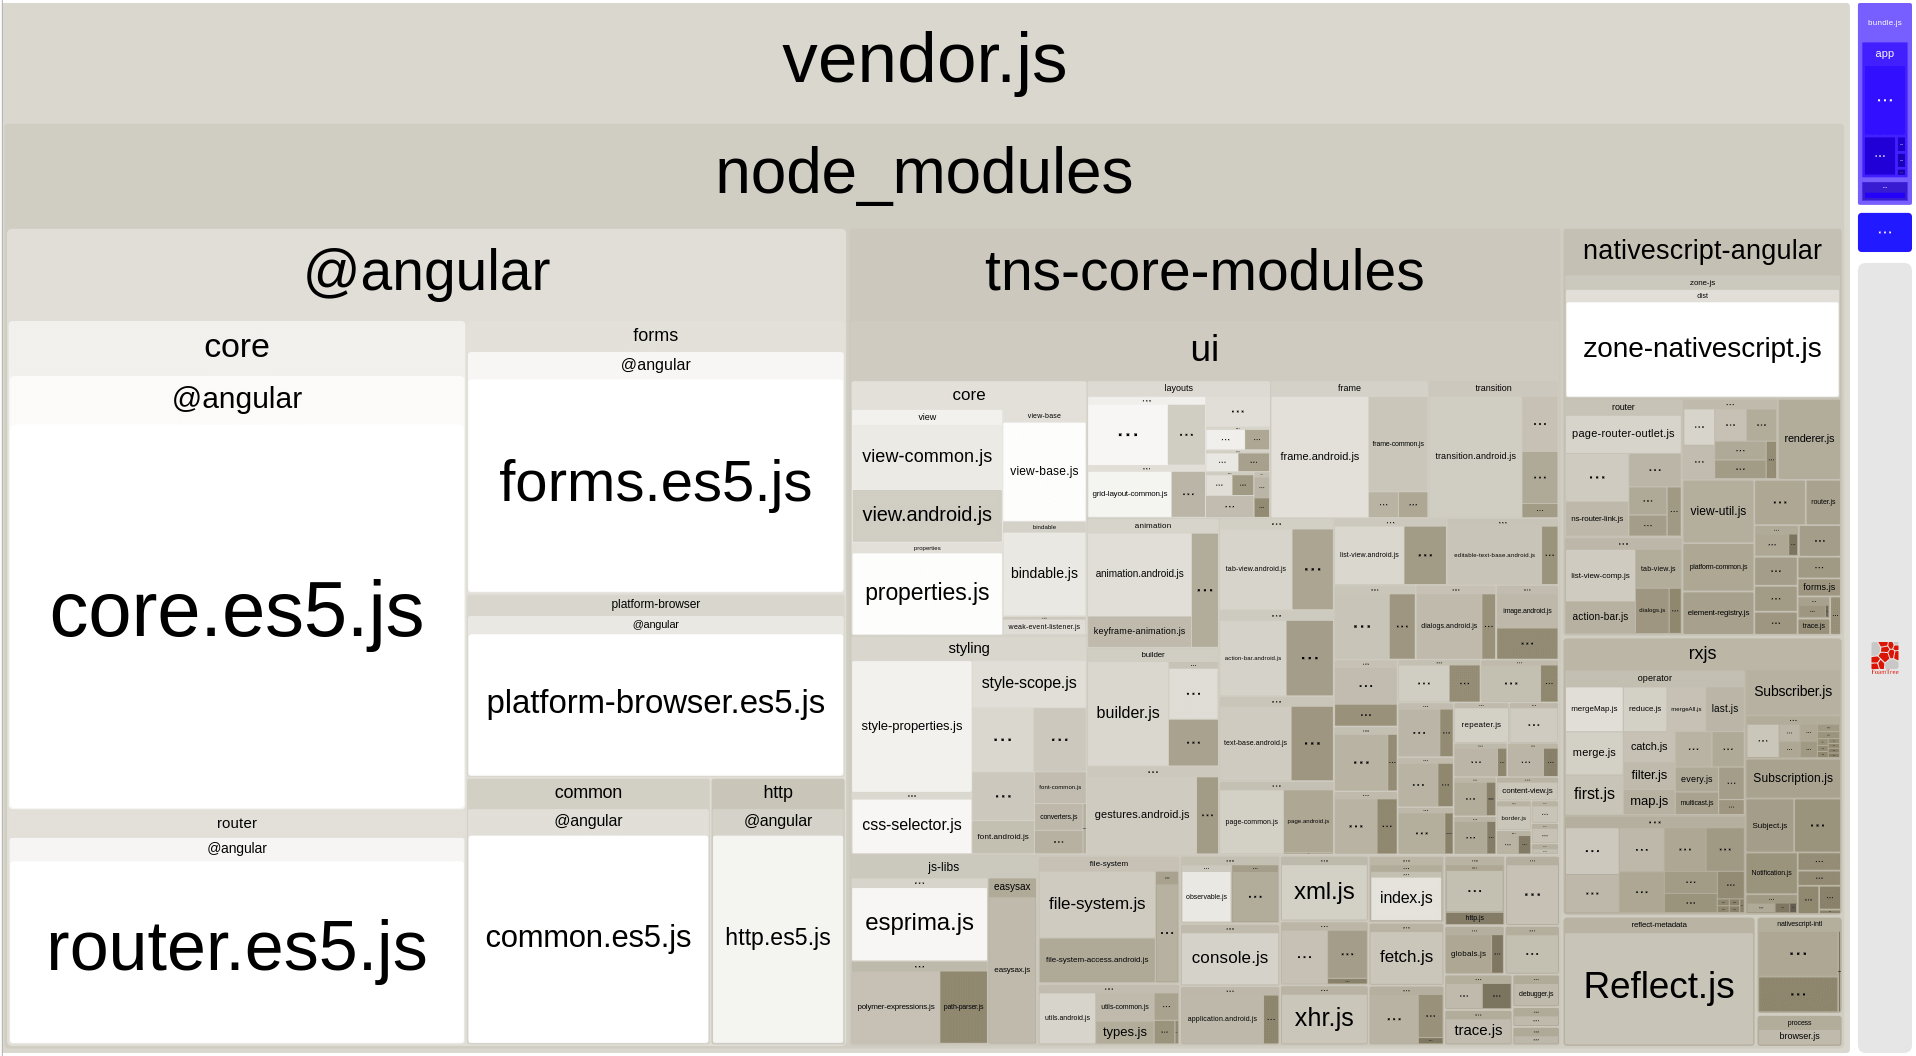
Inspecting Bundles
Bundles are generated in the platform output folders. Look for
the bundle.js and vendor.js files in
your platforms/android/... and
platforms/ios/... "app" folders. You could change
the destination directory by editing your configuration.
Generating Webpack Report
The default webpack configuration includes the
webpack-bundle-analyzer
plugin. To generate a report provide the
--env.report flag:
$ tns build android|ios --env.report
The report is generated inside your-project/report.
The report/report.html page shows the application
chunks.
For analyzing the dependency graph between the modules, use
webpack.github.ui/analyze
and open the stats.json file.
Recommendations for Plugin Authors
Most third-party packages are problem-free and get picked up by Webpack without any issues. Some libraries though require a bit of tweaking. When you encounter a library that does not get recognized by your Webpack configuration, please open up an issue on that library's GitHub repository.
Referencing Platform-specific modules from "package.json"
This is the most common problem with third-party plugins. Most
plugins provide two platform-specific implementations stored in
modules named like my-plugin.android.js and
my-plugin.ios.js. The
package.json file for the plugin looks like this:
{
    "main": "my-plugin.js"
}
Webpack reads the package.json file and try to find
a my-plugin.js module and fails. The correct way to
reference a platform-specific module would be to remove the
.js extension:
{
    "main": "my-plugin"
}
That allows Webpack to reference
my-plugin.android.js or
my-plugin.ios.js correctly.
Emitting Helper Functions in TypeScript Plugins
The TypeScript compiler implements class inheritance, decorators
and other features using a set of helper functions that get
emitted at compile time. NativeScript ships with its
implementations of those helpers to allow features like
extending platform native classes. That is why you need to
configure the TypeScript compiler NOT to emit
helpers. The easiest way is to edit the
tsconfig.json file and set the
noEmitHelpers option to true:
{
    "compilerOptions": {
        ...
        "noEmitHelpers": true,
        ...
    },
    ...
}
Bundling Background Workers
When the application is implementing workers, some additional
steps are required to make the project Webpack compatible. Check
out the
nativescript-worker-loader
and the
detailed documentation article about using workers.
Webpack Resources
Bundling JavaScript code can get complex quickly, and encountering Webpack for the first time can be daunting. A full introduction to webpack and related technologies is beyond the scope of this article, and we recommend the following resources: