RadDataForm Custom Editors
If you followed the
getting started
section, you now know how to edit an object's properties with
RadDataForm for NativeScript. The
editors list
article demonstrated the available editors. This article will
show you what to do if the editor you would like to use is not
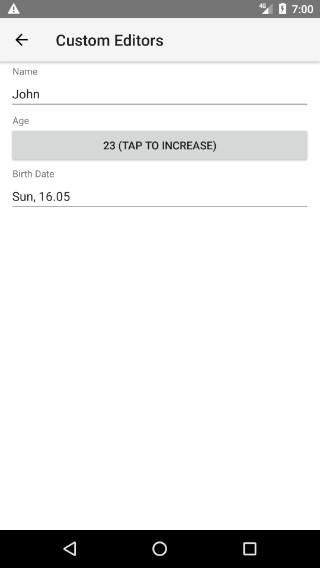
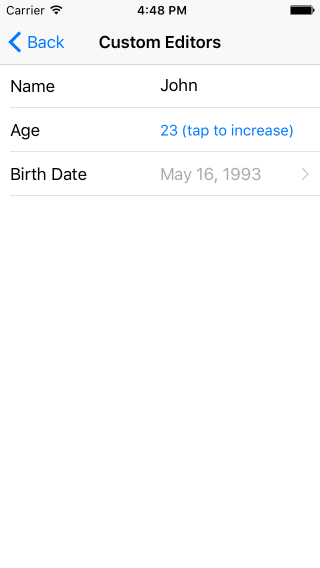
on the list with available editors. For example, if we wanted to
have a Button to change the value of the property
age in this example, we could use
android.widget.Button
in Android and
UIButton
in iOS.
Figure 1: RadDataForm with custom editor


Create a custom property editor
In this article you will learn how to create a custom editor
that uses native Button controls to change its
value as in the screenshot above. First, you will need to set an
instance of
CustomPropertyEditor
as the editor of the EntityProperty associated with
the property of the source object that we want to edit with a
custom editor (in our example this is the
age property):
Example 1: RadDataForm with custom editor
<df:EntityProperty name="age" index="1">
    <df:EntityProperty.editor>
        <df:CustomPropertyEditor
            editorNeedsView="editorNeedsView"
            editorHasToApplyValue="editorHasToApplyValue"
            editorNeedsValue="editorNeedsValue"/>
    </df:EntityProperty.editor>
</df:EntityProperty>
Here's the flow for the usage of the custom editor step-by-step:
-
RadDataFormloads and it needs a view that will be used for the custom editor - the editorNeedsView event occurs. - The original value of the property in our source object has to be loaded in the custom editor - the editorHasToApplyValue event occurs.
- The user interacts with the provided editor view which changes the value of the editor - you have to call the editor's notifyValueChanged method.
-
RadDataFormneeds the current value of the editor - the editorNeedsValue event occurs and we have to update the value of the property depending on the current value of the custom editor.
All aforementioned events are fired with arguments of
DataFormCustomPropertyEditorEventData
type.
Here's what we are expected to do in the handlers of each of the mentioned events:
-
The editorNeedsView event occurs when a view
has to be placed inside our custom editor, so in our event
handler we will create a native view depending on the current
platform and set the result as value of the
viewproperty of the event data (On Android the event data will contain acontextproperty withContextthat we can use to create ourView). -
The editorHasToApplyValue event occurs when
the value of the property has to be used as initial value of
our editor. Here, we will just take the value of the
valueproperty and apply it as formatted text for the view provided with theviewproperty. -
The editorNeedsValue event occurs when we
have to update the property value. This means that we will use
again the
viewandvalueproperties of the passed event data, but this time we will set the value depending on the value of our editor.
This is the Android implementation of the mentioned event handlers:
Example 2: Custom editor implementation for Android
let buttonValue;
export function editorNeedsView(args) {
    const editorView: android.widget.Button = new android.widget.Button(args.context);
    editorView.setOnClickListener(new android.view.View.OnClickListener({
        onClick(view: android.view.View) {
            handleTap(view, args.object);
        }
    }));
    args.view = editorView;
}

export function editorHasToApplyValue(args) {
    updateEditorValue(args.view, args.value);
}

export function editorNeedsValue(args) {
    args.value = buttonValue;
}

export function updateEditorValue(editorView, value) {
    buttonValue = value;
    editorView.setText(buttonValue + " (tap to increase)");
}

export function handleTap(editorView, editor) {
    const newValue = buttonValue + 1;
    updateEditorValue(editorView, newValue);
    editor.notifyValueChanged();
}
Notice that we called the
notifyValueChanged
method of the
CustomPropertyEditor. This is necessary since the value change depends on the
custom editor that we provide and thus it is our responsibility
to notify RadDataForm for the update in the
editor's value and in this example, the value change happens
when the button is pressed.
Here's the iOS implementation of the same event handlers:
Example 3: Custom editor implementation for iOS
let buttonEditorHelper;
export function editorNeedsView(args) {
    buttonEditorHelper = new ButtonEditorHelper();
    buttonEditorHelper.editor = args.object;
    const editorView = UIButton.buttonWithType(UIButtonType.System);
    editorView.contentHorizontalAlignment = UIControlContentHorizontalAlignment.Left;
    editorView.addTargetActionForControlEvents(buttonEditorHelper, "handleTap:", UIControlEvents.TouchUpInside);
    args.view = editorView;
}

export function editorHasToApplyValue(args) {
    buttonEditorHelper.updateEditorValue(args.view, args.value);
}

export function editorNeedsValue(args) {
    args.value = buttonEditorHelper.buttonValue;
}

export class ButtonEditorHelper extends NSObject {
    public buttonValue: number;
    public editor: CustomPropertyEditor;

    public updateEditorValue(editorView, newValue) {
        this.buttonValue = newValue;
        editorView.setTitleForState(this.buttonValue + " (tap to increase)", UIControlState.Normal);
    }

    public "handleTap:"(sender) {
        const newValue = this.buttonValue + 1;
        this.updateEditorValue(sender, newValue);
        this.editor.notifyValueChanged();
    }

    public static ObjCExposedMethods = {
        "handleTap:": { returns: interop.types.void, params: [UIView.class()] }
    };
}
We have created a helper class which exposes a
handleTap method that will be executed when the
native button is tapped. This is explained in more details
here. The rest is quite similar to the code we have in the Android
implementation - editorNeedsView to create the
native view; editorHasToApplyValue - to update the
editor with the provided value and
editorNeedsValue - to provide the value that the
editor currently holds.
References
Want to see this scenario in action? Check our SDK examples repo on GitHub. You will find this and many other practical examples with NativeScript UI.
Related articles you might find useful: